Fix Issue With New Macbook Update: Click not working on Google Chrome / Microsoft Edge App on Macbook

Why You Need Google Tag Manager? 5 Unknown Tips & Tricks of GTM You Should Know
August 14, 2023
16 Reasons Why Your Brand Needs More Focus on Search Engine Optimisation
October 22, 2024Are you experiencing a frustrating issue where clicking in Google Chrome on your Macbook Air / Pro / Macbook Pro 2 running Mac Os Big Sur / Mac OS Sonama is becoming a nightmare? You’re not alone. Many users have reported similar problems, where clicks initially work but gradually become erratic or unresponsive. The good news is that you can likely resolve this issue without too much hassle. In this tutorial, we’ll guide you through the steps to troubleshoot and fix the clicking problem in Google Chrome / Microsoft Edge.

Identifying the Problem
Before diving into the solutions, it’s essential to understand the problem you’re facing. This issue seems to be specific to the Google Chrome / Microsoft Edge application and not related to your Mac’s trackpad or other apps. Here are the common symptoms:
- Clicks initially work but become unreliable over time.
- You might need to repeatedly click or hover over links, fields, or buttons for them to respond.
- The problem can worsen to the point where you can’t click on anything in Google Chrome / Microsoft Edge or even switch between tabs.
- Restarting Google Chrome / Microsoft Edge temporarily resolves the issue, but it recurs.
Fix Click Not Working on Google Chrome / Microsoft Edge App on Macbook
Installing / Uninstalling or deleting the app is not helping the issue. Instead try the following.
In Chrome
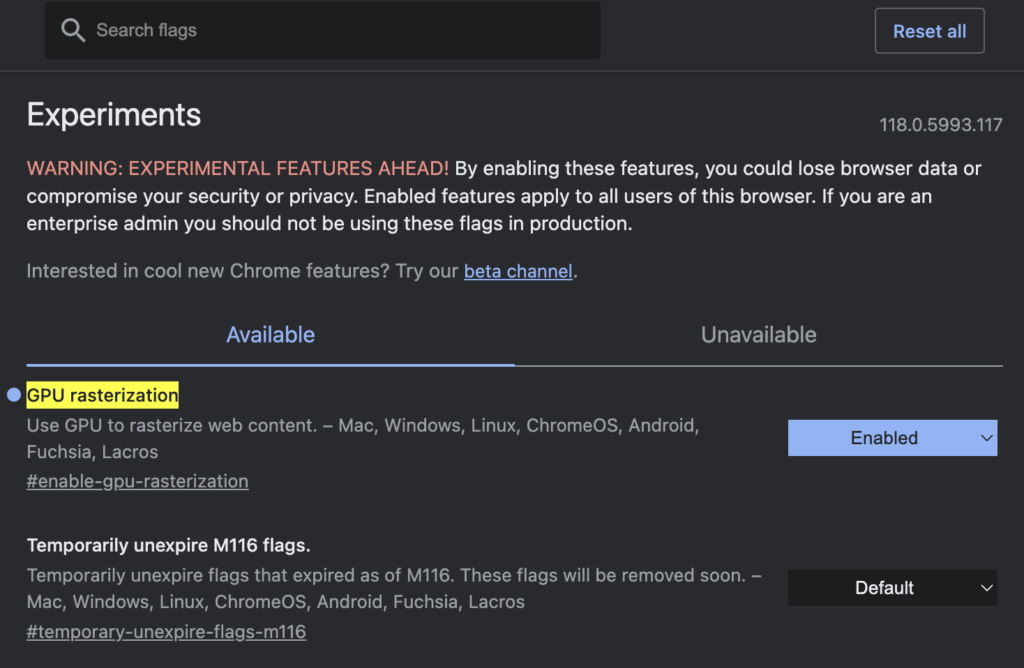
To enable GPU rasterization in Google Chrome, follow these steps:
- Open Google Chrome.
- Type “chrome://flags” in the address bar and press Enter.
- In the search bar on the Flags page, enter “GPU rasterization.”
- Locate the “GPU rasterization” flag and change its setting to “Enabled.”
- Restart Google Chrome for the changes to take effect.
Go to Chrome, Minimise the window and enter

Enable GPU Rasterization will ask for a restart of Google Chrome, and there’s no click / trackpad issue any further
In Microsoft Edge
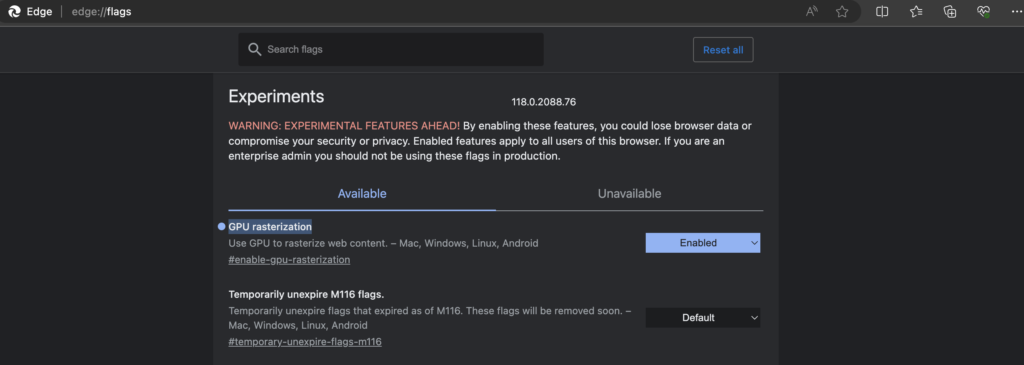
To enable GPU rasterization in Mircorsoft Edge, follow these steps:
- Open Mircorsoft Edge.
- Type “edge://flags” in the address bar and press Enter.
- In the search bar on the Flags page, enter “GPU rasterization.”
- Locate the “GPU rasterization” flag and change its setting to “Enabled.”
- Restart Google Chrome for the changes to take effect.
Go to Microsoft Edge, Minimise the window and enter
edge://flags/

How to Fix MacBook Pro Trackpad Not Clicking
What Actually is happening at backend?
Enabling GPU rasterization in Google Chrome is a feature that utilizes your computer’s Graphics Processing Unit (GPU) to improve the rendering and performance of web pages. GPU rasterization specifically relates to how the browser processes and displays web page graphics and text.
Here’s what enabling GPU rasterization does:
- Faster Rendering: When GPU rasterization is enabled, Chrome offloads some of the rendering tasks from the CPU (Central Processing Unit) to the GPU. The GPU is designed to handle graphical operations efficiently, so this can lead to faster rendering of web pages, especially those with complex graphics or animations.
- Smooth Scrolling and Animation: GPU rasterization can enhance the smoothness of scrolling and animations on web pages. By leveraging the GPU’s capabilities, Chrome can provide a more fluid and responsive user experience.
- Improved Text Rendering: Enabling GPU rasterization can also improve the quality of text rendering. Text appears sharper and more clear when rendered with the GPU’s assistance.
- Reduced CPU Usage: As the GPU takes on some of the rendering work, the CPU is freed up to handle other tasks. This can result in reduced CPU usage and potentially lead to improved overall system performance.
- Hardware Acceleration: GPU rasterization is part of Chrome’s broader strategy for hardware acceleration, which aims to use the full potential of your computer’s hardware to enhance the browsing experience.
